Firstly – Do you do it yourself or get someone else to do it?
I did my own and would never do it again. I really need to strip it all back and do it a second time. Another of my mates repainted his twice which took a year and three times the cost before he got his right.
This is a huge task and should not be undertaken lightly. Preparation of the surface is the major part of the task. According to the books and websites I consulted over 85% of the total task is in the preparation. Personally I reckon it’s more in the 95% + range.
But even so the actual application of the paint is a skill which apprentices take four years to learn so don't feel you will be certain of producing a good result on your first attempt. The instructions give the impression that all you have to do is sand back the gloss on the gel coat and smooth out the other rough surface stuff and paint. Unfortunately this is not the case.
Basically the surface must be smooth as a mirror before you apply the undercoat otherwise the imperfections become really, really obvious. The uniform colour of the under or top coat seems to make the imperfections stand out. You can't paint it and then fill all the defects after. Most filler products won’t adhere well to the undercoat or at all to the top coat so you can’t just fill up pin holes later and patch paint. They may require major sand back and repaints.
From experience, I can state, don’t do the preparation in a shed with poor lighting. You need to be able to see every imperfection. It will look good until you take it out in the daylight and you wonder how you could have missed them. At worst you need a VERY good light set up that can be moved to highlight the surface.
By the time you finish bogging and filling and sanding you may end up with varying colour patches which further hide defects. Use a light mist of coloured primer to uniform the colour to show up the surface imperfections. I have read articles which said use a dark primer. I found that this did not show up the defects as well as white primer.
Filler and bogs.
I used a range of fillers and ended up having a bit of a patchwork. Some are better for specific areas and some seem to have no great advantage. These are the thoughts I have on them.
1. Epoxy & Flock – The stuff you use for fusing together main components. This is very hard and strong. Be aware it is very hard to sand especially over wide areas. If you have some left over from a mix and decide to use to fill some of the screw holes etc. be aware that you will be making a hard job for yourself when it comes to sanding back. Takes a long time to cure.
2.Epoxy & Q Cells (microspheres) This stuff is very light, a bit hard to mix up but is pretty easy to sand back. The surface though ends up being a bit rougher than some of the others. It is good for large areas needing filling because its very light (being hollow glass microspheres.) Binds really well to bare epoxy surface even when applied very thinly. Again, takes time to cure.
3.Epoxy & Talc – I didn’t use this much but an experienced jabiru builder friend did when he helped fill around the windows and doors for me. Results in a much smoother surface than Q cells, but still takes a long time to cure. Still heavy so need to consider the weight in large areas. Probably marginally harder to sand than the Q cells but still pretty easy.
4.Polyester Car Filler – “Automotive Bog” Fairly useful. Cheap. Cures fairly quick so can sand back, add layers etc without having to wait for ages. Doesn’t always stick well if you have very thin layers or if have already painted with primer. Not very good for filling pinholes. Doesn’t sand back well as often end up with pinholes when you sand. But you can refill over it to eventually get the pinholes out. Even when sanded smooth has a rougher look under primer than talc but under the topcoat the difference seemed to disappear.
5.Diamond Glaze Self Leveling Filler - A polyester filler. Smoother sanding and far fewer pinholes than standard car bog. Cures very fast – 30 seconds if you put just a fraction too much hardener so can only use small areas at a time. Advantage is that it goes down into small pinholes and cracks easily. Fairly easy to sand.
6.Marine Stop Putty – Good for pinholes. No mixing required. Fills the holes and dries quickly. Not as good for larger defects because then takes a long time to cure and sags with curing so often need to do a second fill unless overfill a lot and then wait ages for it to cure completely. I found it only good for pinholes but it is the filler of choice for them. And since there are thousands of pin holes I used a fair bit of this.
7.Septone Spray Putty – Spray putty of one brand or another is what Jabiru use for their bogging and they do a good job. They must put a lot of coats on because it is fairly thick. But applying it thickly (in multiple thin coats) and sanding back gives best chance of an immaculately smooth finish.
I only used this on one area as I discovered it after I had done most of the painting. This seems like the answer to problem of the thousands of pinholes. It worked well when I used it. Doesn’t stick well to any area already coated in top coat paint but seemed to adhere to bare epoxy or epoxy primer well. It is acrylic so I hope this won’t cause a conflict with the epoxy or the any of the polyester fillers I used.
Comments about painting:
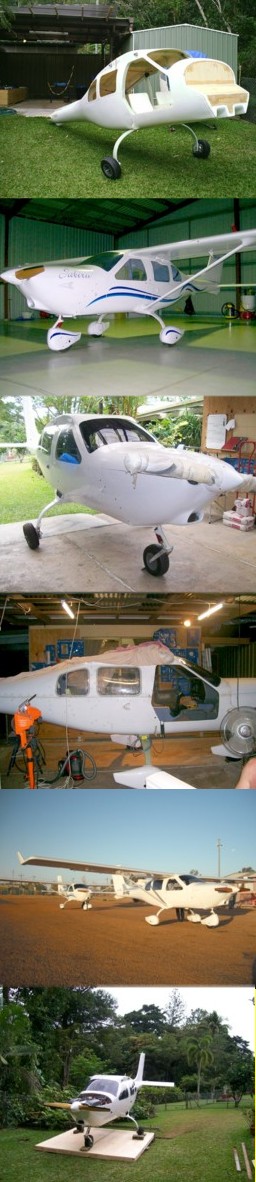
Firstly the Gel coat.
It has many imperfections in it anyway, especially around joggle margins and edges. Mine had lots of lumps and bumps over the fuselage surface. In fact I became totally dismayed at how bad the gelcoat was. I get the feeling they gave an apprentice having a bad day a first go at it when they did mine. Also there are many (thousands) of tiny pin holes just below the surface. These are in fact air bubbles in the gel coat which are broken into when you sand back the surface of the gelcoat. They are often not visible until you put on a coat of a uniform coloured paint. Then they stand out. I used beige epoxy primer which showed up most of the defects although white primer (when I used some) and the white top coat showed up defects really obviously.
Secondly the areas where you have laid glass or epoxy.
These are going to be very rough, uneven and require preparation. They will have hills and depressions, pin holes and dents that will require lots of filling and sanding to make them suitable to take the paint.
Thirdly the surfaces between adjoining components are often not at the same level. For instance from the doors surfaces to fuselage around the doors, around the junction of the front cowls and the fuselage and also where the end caps are joined to the horizontal stabilizer. There is a limit to how much you can sand down so I had to build up in lots of these areas to get a smooth line from one surface to another. All these then requires major filling and sanding.
Fourthly, the small irregular surfaces such as spats, fairings and covers are all very complex and time consuming to sand. They required innovative use of home made odd shaped sanding blocks to prepare the surface. They also were full of pin holes and adjoining edges had to be built up to match the surfaces.
Painting
If you live in a town you may have by-laws that prevent you doing it in your own shed etc. You may be allowed to build a booth or you may have to hire a booth at a car painters etc. Find out what you can do and be aware that if you paint at home there is no hiding it from the neighbours! The sanding dust and spray drift you get is enormous!
Paint types:
I don’t know much about paint, just what I was told by vested interests at various paint shops. What I settled on was epoxy two part primer and "2K Cobra" two part auto top coat.
I stayed away from urethane as I was told it was easier to stuff up and hard (or impossible to fix once stuffed up). A mate of mine did a Long Eze (the three times painted job mentioned earlier) and the final job is absolutely immaculate glass-like perfection. (Won best composite and Concourse de Elegance at the SAAA Fly In at Cowra 2007) But I would never want to go through the two complete strip and sand backs he did to get there.
Spray painting has two great areas for disaster.
Mixing and Spraying
Mixing
I found out – to my dismay – that many factors, even changes of temperature, require knowledge of changing the amount of thinners, hardener etc that requires experience and skill. I was told that relatively minor changes in humidity make a difference as well which limited my painting due to a bout of prolonged bad weather in the middle of the paint period.
Spraying.
You need to know how to get even coats, prevent runs and getting just the right amount in a pass to create a glassy finish on your aircraft. You don’t want to be learning on your plane and with the expensive paint. I tried it and managed to create several good examples of every defect known to man and some yet to be described in the painters handbooks. I then had lessons in how to correct defects as well so I guess I am getting a well rounded education!
You need to get lessons and you need to spend time and money practicing on something else which consists of similar surface, similar large areas and similar type of paint.
Just be prepared for a lot, lot more time and work than is inferred in the instructions. I chose to prepare and paint the plane myself. Had I really been aware of the work load I would have probably not gone down this path.
Other options.
Get someone else to paint it for you. This sounds like a cop out but in retrospect would probably have been the best option for me.
Also be wary of just getting a painter who offers to paint it if you do the preparation. You will do 85% of the work and still potentially end up with a bad job if the painter just paints over your surface without correcting any defects.
You will still have to make an investment into a booth of some description. Sanding produces a huge amount of dust that gets into everything and is exceedingly hard to clean out of concrete floors, cracks in walls, equipment and tools. So you must still consider use of a booth or enclosed area with ventilation extractor fans etc etc depending on where you live/build.
Technique:
Again there is a major skill involved. I found getting the right amount of spray in each layer to be very hit and miss even when I was up to the last areas of painting. It is very easy to put on too much and get runs or too little and get a frosted glass appearance of the surface.
In the end I had to go and spend lots on the paint, lots on the place to do the job, lots on the preparation, and then lots on repairing the problems just to get a mediocre job.
Getting someone else with skill to do it first up is actually probably a better way of doing it.