This very first step illustrates the problem I faced with almost every step of the build due to the manual not really explaining anything properly. This leaves you often wondering what you should be doing. It is somewhat prophetic that the very first step should have been such a significant cause of uncertainty.
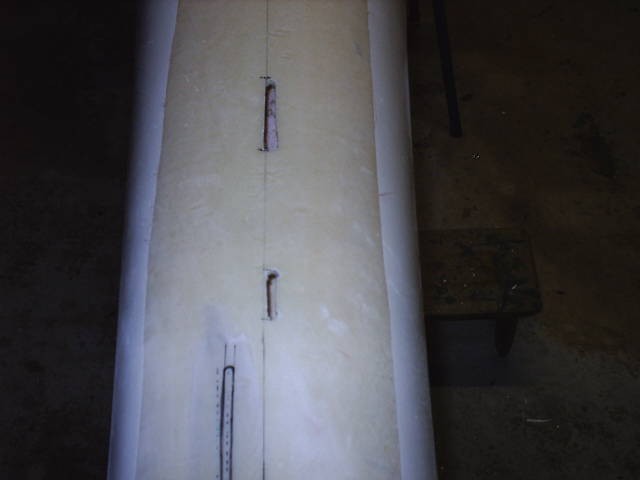
The first step is to turn the fuselage upside down and cut out two small oblong holes and then epoxy on the trim horn. This sounds really easy and straightforward. Made even easier since the factory has drawn the outline of the holes in felt tip pen.
Now this first drilling of holes is something REALLY BIG for the novice builder. So big in fact that it took me four hours!
The instruction manual says cut out the marked holes for the trim cable and static tube. When you look at the marked holes they have been drawn in thick "Nikko" felt tipped pen.
What went through my head was:
"Do I cut on the inside or the outside of the line? "
"Does it make any difference? "
And what about the fact that the holes look like they should be in the midline of the fuselage but aren't? Is this a factory error in where they have drawn the lines?
Should they be parallel to the midline? (one of mine was not )
I decided to check if they really were off-midline so I had to first establish where the midline was. This turned out to be very hard because there are no reference points from which to measure. The moulding of the fuselage is pretty roughly finished and all the corners and surfaces are rounded so no points exist from which to begin your measurements.
An hour or more later I finally had a line drawn which I was confident was truely in the midline. Yes the holes were off centre. But was that correct or not?
I then printed out a blown up picture from the manual of the holes and carefully drew lines on it to establish that the holes seemed in fact to be slightly off midline in the diagram as well. But they were not so obviously off line for me to be certain. They certainly were not as far off centre as my hole marks were.
I went to the Jabiru website to see if there was any help. None. I started hunting around the internet and found a couple of websites of other builders. While they weren't helpful for this exact point they did provide me with info for future problems I was to face. They also lamented how bad the manuals were. I was beginning to find that out. Another hour later I was still no closer to cutting the first hole!
At this point I decided to email Jabiru and ask. So I took photos of the marks and my newly established midline and asked if the holes should be off centre or if they should be in the midline. For some reason I then decided to go with the marks they had drawn, despite their position and cut them out. So I carefully cut along the inside of the marks, so I could file it out to the bigger size if needed. Then I had another attack of the guilts because I became convinced now that the holes should have been in the midline. Too late they were done. So I salved my conscience by sitting down and carefully sanding and filing the holes till they were beautifully smooth and perfect.
Four hours after I started I had drilled & cut two oblong holes!
Later the real situation became apparent:
1. It is completely irrelevent where you put them. The cable and tube that go through them can easliy be bent a bit left or right and it doesn't matter whether they are in the midline or not! Its reasonable for them to be close that's all.
2. Next with EVERY hole you cut, drill or make - find out what is going to go through the hole, find it, test it and make sure it fits through the hole!
I cut these holes exactly as per the lines drawn ( which later turned out to be too small ) and then installed the ventral fin cover. Several weeks later I tried to pass the cable through the hole and it wouldn't fit. Worse the hole was now unreachable under the cover. I managed to find a long big drill bit and a flexible drill shaft and drilled out the hole very roughly as I couldn't reach it properly. I then zip-tied a file to a stick and smoothed it as best I could. My careful job of sanding the holes smooth was completely wrecked and wasted!
The Trim Horn.
The instructions say to epoxy this in place off-centre on the predrawn marks. Beware that the trim horn plus the trim assembly and cable have to fit inside the ventral fin cover. The ventral fin cover has to sit in the midline. The trim cable will sit on the outside of the trim horn which means the assembly will impinge on the cover if it is too far off centre. My factory marks were too far off centre and I took the marks at face value and epoxied the trim horn in place.
Later, with the complete trim assembly in place, I found when installing the removable part of the ventral fin cover it would not fit. I was left with the devastating problem of thinking I would have to pull the whole lot apart some months later and rebuild it closer to the midline. In the end I reshaped the cover by heating it with a heat gun but it was a difficult job.
I would suggest you check the positions of ALL the bits before you epoxy the horn in place. Get the cable and the trim assembly and assemble them on the horn. Then make sure that with the horn in place and with the bits attached that it will fit inside the fin cover. You may have to move it slightly back toward the midline but don't move it far! The trim assembly also has to attach onto the elevator pitch arm (which you will install much later - can't try it for position at this stage) so you can't move it much. Just so there is clearance for the ventral covers to sit over the assembly.
At this point it is worth mentioning that Jabiru don't follow their own advice about the order of build. The recommended build order page says that this section with holes, horn and forward ventral fin cover are done first. But something that escaped my stressed brain at the time was that their photos of installing the ventral cover show all the internal bits (horn, trim assembly, cables and stuff) already installed.
I would also suggest you DON'T install the front half of the ventral fin cover until you have installed all the trim assembly and cable - but DO check that it will fit properly before epoxying the trim horn in place. Position it, drill the holes and use temporary screws to fix it in place. That way you can shift it if the assembly won't fit inside it. Epoxying it in place later is easy to do.