Installing the Autopilot Pitch Servo
The pitch servo is located in the fuselage behind the sound curtain and is connected to the elevator pitch horn via a push-pull cable of the same type as the Jabiru primary controls.
I have spoken to other people who have either done or seen it done in the opposite direction. ie: the push-pull cable is run forward and connected to the joystick. I can't say whether this idea is better or worse than my setup.
Although the Dynon Support forum suggests that having the two servos going to the stick may get some movement of each even if you try to only move in one direction ("coupling"). They say completely de-coupled is better, though they don't say why.
The whole pitch servo setup consists of:
1: Servo (In my case the SV 42 model which is the higher torque model recommended by Dynon for Jabirus.)
2: Mounting bracket
3: Push Pull cable
4: Wiring loom
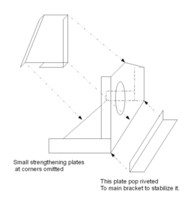
The mounting bracket.
This was a modification from a photograph I was sent by another builder and basically consists of a flat plate (which bolts to the fuselage floor) with a 90 degree angle plate which sits vertically and secures the servo itself and the forward cable clamp. It is all made from aircraft grade aluminium and is pop riveted together.
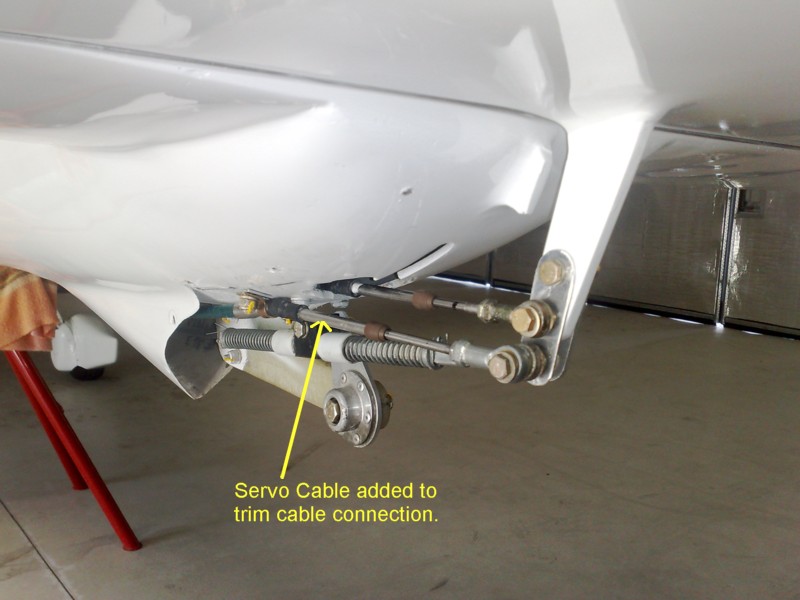
Rear Connection:
I fed the cable through the belly channel and then out though the same hole as the trim cable. The cable rod end is then connected to the elevator pitch horn. I had to add an extra plate to provide stability but otherwise it was straight forward.
I had to do some trials to find the position where the servo sweep angle was adequate so it did not inhibit the full range of the elevator.
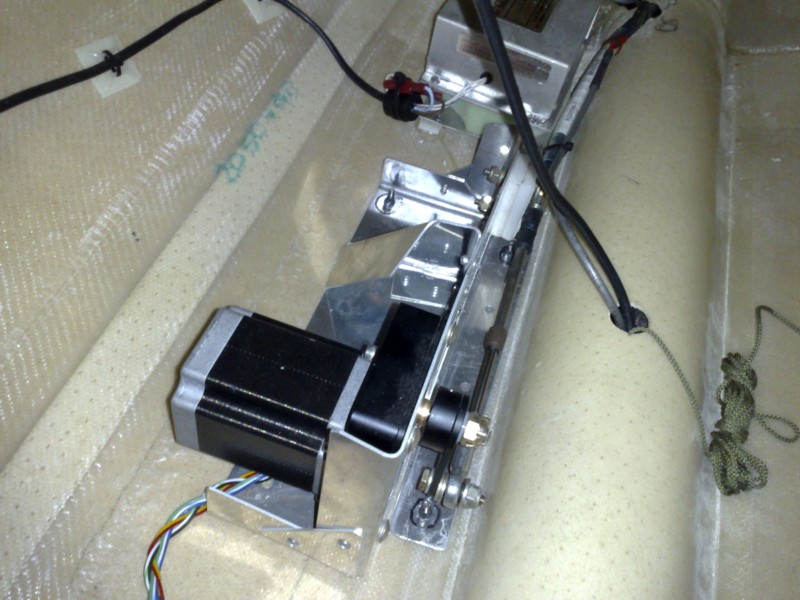
My apologies for the photo. It is difficult to get a better angle for the image once it was in place inside the fuselage. The box at the top middle of image is the strobe power box. The pitch servo and bracket are in fore-ground.
Note the push-pull cable leaving servo arm and entering belly channel at top and near right of image.
Sourcing the cable:
I spoke with Jabiru who initially gave me the name of the company in Melbourne that they source their cables from (I have forgotten the name but will try and find it and add it here). However it is immaterial because when I phoned the company they would not deal direct with me.
Initially they said they could make the cable to any length I required. They then asked what quality I wanted and I said "The same quality as the cables they make for Jabiru Aircraft". Their response was to say they would not supply cables for aircraft due to risks of litigation.
They did however say if I ordered it through Jabiru, giving Jabiru the length required, they would supply Jabiru and I could purchase it from Jabiru. I phoned Jabiru and explained and they ordered it for me. In the end, no big deal but just a bit convoluted.
Setting up the pitch servo to work with the trim system:
I thought this was going to be a big problem but it turned out to be pretty much a non-event.
I was concerned the servo would not over-ride the trim or if I backed off the force of the trim it would be too weak to work when I was flying manually (especially say during landing etc when you want the trim to be helping you.) On initial testing it was not strong enough to override the trim in upward deflection. This was evident by the sound of the servo slipping and the dynon screen showing a slipping warning.
In the end I did move the trim spring retaining ring on the forward arm one hole forward. I also lubricated up the cable ends and took off the rubber sleeves on the cable ends. This all took some of the friction out of the cables and the system worked on first test. Later flying tests showed the trim was more than adequate still, for landing or hands off flying.
How to test it for basic slippage.
Done on the ground.
Once all connected - set the QNH for current ground altitude then turn the AP into altitude hold mode. Wait for the AP to settle. Then just dial in a change in the QNH and the Dynon interprets your altitude to be changing. Then sit and watch the AP try to "fly" you to the new height. If you get slippage against the trim it will be evident.
Once you are confident it works against the elevator and trim with no added force of the air you need to take it flying and see if it works.
The rest of the testing is done by following the manual.